| | |
 |  |  |  |  |  |  |  |  |
| Web Output - Creating Web Pages (page 2) |
 |
|
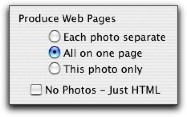
3. Select your output options:
To give each image and its annotations a separate page, click the Each photo separate radio button.
To put all the images and annotations on one web page, click the All on one page radio button. | |

|
| | | | |

|
| |
To output just the current image and annotations (useful if you are updating pages), click the This photo only radio button.
To output just the HTML without generating the image files (useful if you’ve changed the text without changing the image settings), check the No Photos - Just HTML checkbox.
4. Click the OK button. The HTML and images for your web pages will be generated and your web browser will be asked to open the Table of Contents (or first page, if there is no Table of Contents page). At this point, you can look at the results. If you want to change something, it's easy to go back to PhotoToWeb, tweak some settings, and generate the web pages again. |
|
 |
|


